At its core, brining is simply soaking meat in a saltwater solution before cooking. This old-school technique works wonders for locking in moisture, tenderizing the meat, and adding deep flavor from the inside out. It’s easy, inexpensive, and practically foolproof — which is why more home cooks (and pros) swear by it. Whether you go with a wet brine or a dry rub, the payoff is the same: juicy, tender meat that’s seasoned all the way through.
To Brine or Not to Brine?
When it comes to turkey prep, brining can be a great tool — especially for lean or conventional birds. A proper brine (wet or dry) can help tenderize the meat, lock in moisture, and season it all the way through. The result is a juicier, more flavorful turkey — even if you slightly overcook it.
That said, Our Fresh All-Natural Turkeys are naturally plump, flavorful, and tender thanks to the way they’re raised — never frozen, never pumped with water, and always all-natural. Because of that exceptional quality, they don’t need to be brined to stay juicy.
Instead, we suggest simply seasoning them with one of our signature marinades:
Herb Marinade – a classic mix of olive oil, garlic, rosemary, thyme and sage that deepens the turkey’s natural flavor.
Citrus Herb Marinade – bright and aromatic, with notes of orange, oregano, thyme, onions, parsley and rosemary for a fresh, zesty finish.
Each marinade enhances the turkey’s natural richness and helps achieve beautifully crisp, golden skin.
Pro Tip: When you start with a Prime Time Butcher Amish turkey, you’re already ahead — brining is optional, but delicious seasoning is essential.
Why Brining Works If You Choose?
Brining changes meat on a microscopic level. When salt hits the protein, it draws in liquid and rearranges the muscle fibers so they can hold onto more moisture. Think of it as giving the meat tiny water pockets that stay juicy even after hours in the oven or smoker. The result? Tender, flavorful bites from edge to bone.
What You’ll Need
Always use a non-reactive, food-safe container — stainless steel, heavy-duty plastic, or glass — big enough for your meat to be completely submerged but still fit inside your fridge. Special brining bags work great, but a large stockpot or food service tub does the job just as well.
What Meats Benefit from Brining
Brining shines with lean cuts that tend to dry out — like turkey, chicken, pork, veal, or poussin. Richer, more flavorful meats like beef, lamb, and venison don’t usually need it since they already have plenty of natural fat and flavor.
Brining a Turkey
Turkey is the most famous candidate for brining — especially around the holidays. Because of its size, you’ll need a large container or cooler. If you’re using a cooler, fill it with ice to keep the brine cold for 12–18 hours. If you’re brining in the fridge, you may need to remove a shelf to fit the bird. Keep the turkey fully submerged (a heavy plate works as a weight), and if needed, surround the container with gel ice packs to maintain temperature safely.
Mixing the Perfect Brine
Salt is the star of the show, so choose a clean-tasting kosher salt like Diamond Crystal. Add a touch of sugar (¼ cup per quart of water) to help with browning and balance the flavor. From there, you can build layers of taste with aromatics — garlic, herbs, citrus, peppercorns, or even fruit juice.
Basic ratio: ¼ cup kosher salt + ¼ cup sugar per quart of water.
Timing Matters
Allow roughly one hour of brining per pound of meat. After brining, rinse off excess salt and pat the meat completely dry. For poultry, air-dry in the fridge, uncovered, for several hours or overnight to crisp the skin. The cold air will tighten and dry the surface, helping it brown beautifully in the oven or smoker.
Pro tip: Skip using pan drippings from brined meats for sauces — they’re often too salty. Keep some demi-glace or low-sodium stock on hand for your gravy or glaze.
Dry Brining: Our Favorite Method
Because our turkeys and meats are already top-quality, we usually go with a dry brine — a simpler method that delivers extra-crispy skin and concentrated flavor. Instead of soaking, you rub the meat generously with a mix of salt, sugar, and spices, then refrigerate it uncovered for 1–3 days.
How to Dry Brine a Turkey
Make sure the turkey is fully thawed and patted dry.
Gently loosen the skin over the breast and thighs so seasoning can reach the meat.
Mix your brine: about 1 teaspoon kosher salt per pound of turkey. Combine with your favorite herbs and spices — thyme, sage, rosemary, garlic powder, pepper, lemon zest, or even smoked paprika.
Rub the mixture evenly all over (and under the skin), then place the bird on a roasting pan or sheet tray.
Leave it in the fridge, uncovered, for at least 24 hours (small birds) or up to 72 hours (larger turkeys).
When ready to roast, pat the skin dry again. You’ll notice it looks tight and slightly translucent — that’s a good sign! The drier the surface, the crispier the skin.
Dry Brining Tips
Always start with a fully thawed bird.
Get some of the brine under the skin for maximum flavor.
For best results, give it a full 3 days to rest.
If fridge space is tight, you can loosely cover it, but uncover for at least 12 hours before cooking.
For a luxurious finish, slide truffle butter under the skin before roasting — it takes the flavor over the top.
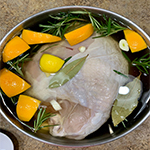
Citrus-Herb Wet Brined Turkey
Ingredients
For one whole turkey (12–16 lbs):
- 1 gallon cold water
- 1 cup kosher salt (we recommend Diamond Crystal)
- ½ cup brown sugar
- 2 oranges, sliced
- 1 small bunch fresh thyme
- 3–4 sprigs fresh rosemary
- 1 tablespoon whole black peppercorns
- 6 cloves garlic, smashed
- 2 bay leaves
- 1 tablespoon honey or maple syrup for a touch of sweetness (Optional)
- Ice or cold water as needed to fully submerge the turkey
Instructions
Make the Brine Base
In a large stockpot, combine 1 quart of water with the salt, sugar, peppercorns, garlic, and bay leaves.
Bring to a simmer, stirring until the salt and sugar dissolve completely.Add the Flavor
Remove from heat and stir in the orange slices, thyme, and rosemary.
Add the remaining cold water (or a mix of water and ice) to cool the brine completely — the liquid should be cold before adding the turkey.Submerge the Turkey
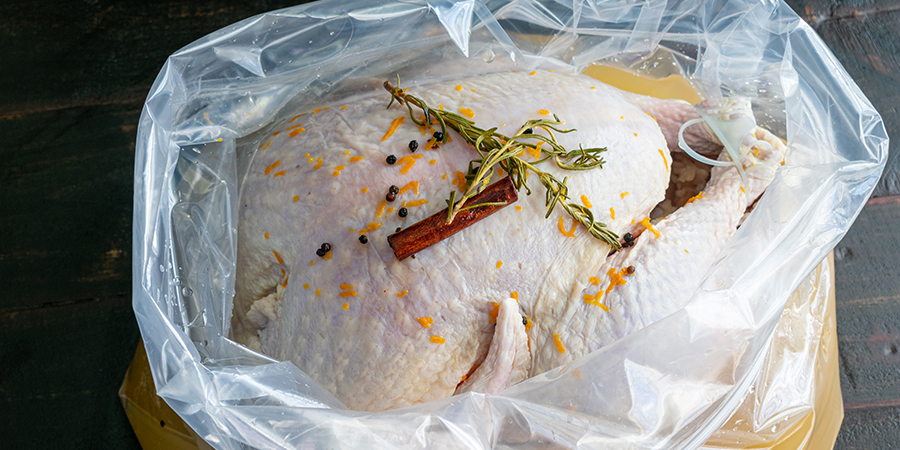
Place your thawed turkey (giblets removed) breast-side down in a non-reactive container or brining bag.
Pour the cooled brine over the bird, adding extra ice or cold water if needed to ensure it’s fully submerged.Brine Time
Refrigerate (or keep in a cooler packed with ice) for 12–18 hours.
Turn the turkey once halfway through to ensure even brining.Before Roasting
Remove the turkey from the brine, discard the liquid, and rinse the bird inside and out with cold water.
Pat completely dry with paper towels.
For the crispiest skin, let the turkey air-dry in the refrigerator, uncovered, for 4–12 hours before roasting.
Notes
Cooking Tip: Before roasting, rub the turkey with butter, olive oil, or one of our house marinades — Herb or Citrus Herb — for an extra layer of flavor and beautiful golden skin.
This citrus-herb brine adds brightness and aroma to every bite — perfect for anyone who loves a hint of orange and fresh garden herbs in their Thanksgiving turkey.